Thresholding
Thresholding is the art of making a decision: is this pixel “foreground” or “background”? It converts a grayscale image into a binary image — pure black and pure white, nothing in between. This is essential for tasks like contour detection, OCR, and object segmentation where you need to separate “stuff” from “not stuff.”
Simple Thresholding
Section titled “Simple Thresholding”cv2.threshold() applies a single global threshold to every pixel in the image:
- Pixel value above the threshold → set to
maxval(usually 255, white) - Pixel value below the threshold → set to 0 (black)
import cv2
img = cv2.imread("photo.jpg", cv2.IMREAD_GRAYSCALE)
# Returns: (threshold_value_used, thresholded_image)ret, binary = cv2.threshold(img, 127, 255, cv2.THRESH_BINARY)The Five Threshold Types
Section titled “The Five Threshold Types”OpenCV provides five different threshold behaviors:
Input pixel value: V    Threshold: T    Max value: M
THRESH_BINARY:       V > T  →  M,   else  →  0THRESH_BINARY_INV:   V > T  →  0,   else  →  MTHRESH_TRUNC:        V > T  →  T,   else  →  V   (caps at threshold)THRESH_TOZERO:       V > T  →  V,   else  →  0   (keeps above, zeros below)THRESH_TOZERO_INV:   V > T  →  0,   else  →  V   (keeps below, zeros above)
In practice, THRESH_BINARY handles 90% of use cases. The others are useful for specialized tasks like clamping dynamic range.
# The most common variants_, binary = cv2.threshold(gray, 127, 255, cv2.THRESH_BINARY)_, binary_inv = cv2.threshold(gray, 127, 255, cv2.THRESH_BINARY_INV)The Problem with Simple Thresholding
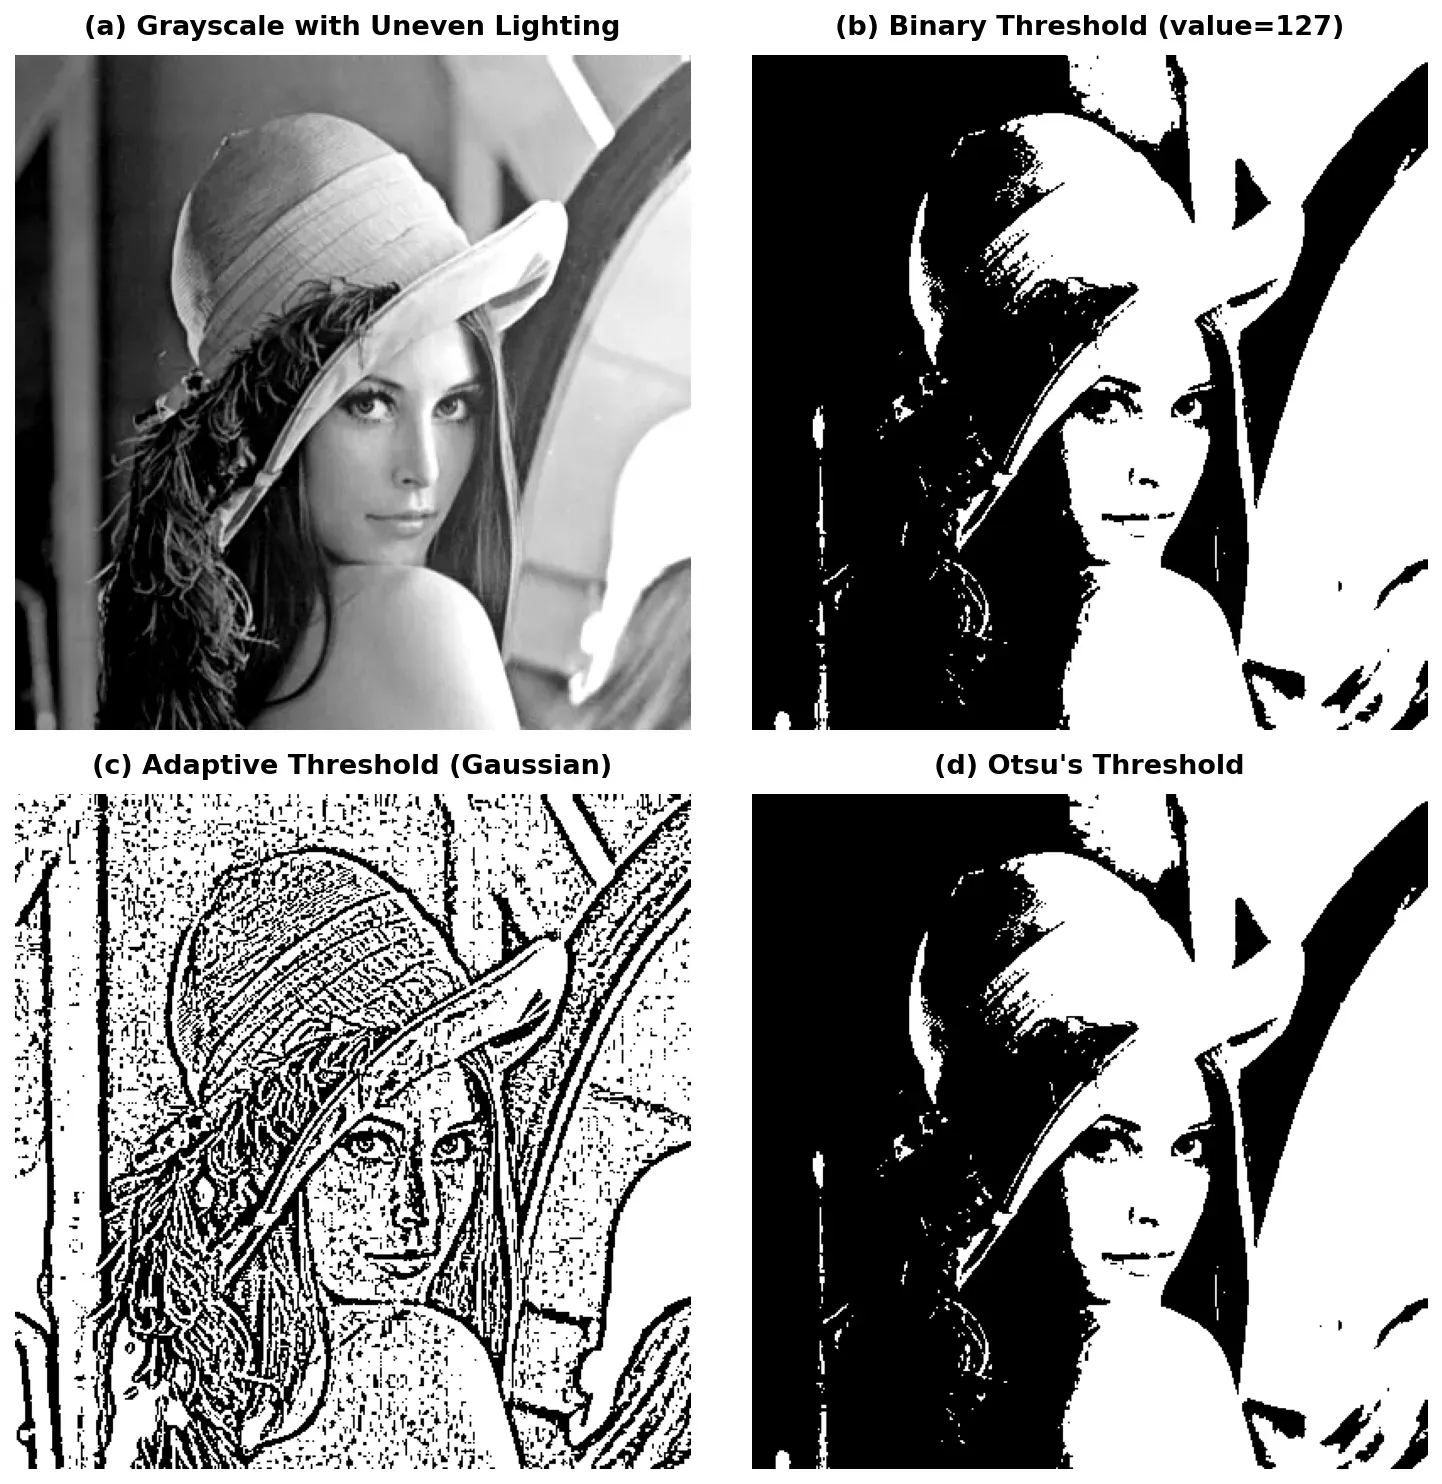
Section titled “The Problem with Simple Thresholding”A single global threshold works great when lighting is uniform. But the real world is rarely that kind. Consider a photo of a document with a shadow across it — the left side is darker than the right:
Pixel intensities across the image:
Left (shadow):  [40, 45, 50, 55, 60]    ← Text here is ~50Right (bright): [180, 190, 200, 210, 220] ← Text here is ~190
With threshold = 127:  Left side → ALL BLACK (text and background both below 127)  Right side → ALL WHITE (text and background both above 127)
Result: You've lost all the text on the shadowed side!
This is where adaptive thresholding comes in.
Adaptive Thresholding
Section titled “Adaptive Thresholding”cv2.adaptiveThreshold() solves the uneven lighting problem by computing a different threshold for each small region of the image. Instead of one global number, it looks at the local neighborhood around each pixel.
# adaptiveMethod: how to compute the local threshold# blockSize: size of the neighborhood (must be odd)# C: constant subtracted from the computed threshold
adaptive = cv2.adaptiveThreshold(    gray,    maxValue=255,    adaptiveMethod=cv2.ADAPTIVE_THRESH_GAUSSIAN_C,    thresholdType=cv2.THRESH_BINARY,    blockSize=11,    C=2)
The Two Adaptive Methods
Section titled “The Two Adaptive Methods”| Method | How It Works | When to Use |
|---|---|---|
ADAPTIVE_THRESH_MEAN_C | Threshold = mean of the neighborhood minus C | Simple, fast |
ADAPTIVE_THRESH_GAUSSIAN_C | Threshold = Gaussian-weighted mean minus C | Better results, slightly slower |
Tuning the Parameters
Section titled “Tuning the Parameters”- blockSize: Controls how “local” the threshold is. Larger values = smoother threshold, smaller values = more responsive to local changes. Must be odd (3, 5, 7, 11…).
- C: A fine-tuning constant. Increasing C pushes the threshold lower (more white pixels). Decreasing makes it higher (more black pixels). Start with 2-5.
Otsu’s Method — Let the Computer Decide
Section titled “Otsu’s Method — Let the Computer Decide”What if you don’t want to pick a threshold value at all? Otsu’s method analyzes the image histogram and automatically finds the optimal threshold that minimizes the combined spread (variance) of the foreground and background pixel groups.
The idea: if your histogram has two peaks (a “bimodal” distribution — one for the background, one for the foreground), Otsu finds the valley between them.
# Pass 0 as the threshold value — Otsu will override it# Add cv2.THRESH_OTSU as a flagret, binary = cv2.threshold(gray, 0, 255,                            cv2.THRESH_BINARY + cv2.THRESH_OTSU)
# 'ret' now contains the threshold value that Otsu calculatedprint(f"Otsu selected threshold: {ret}")The Power Combo: Gaussian Blur + Otsu
Section titled “The Power Combo: Gaussian Blur + Otsu”Otsu works on the histogram, and noisy images have messy histograms. By blurring first, you smooth the histogram and help Otsu find cleaner separation:
# 1. Blur to smooth the histogramblurred = cv2.GaussianBlur(gray, (5, 5), 0)
# 2. Otsu on the blurred imageret, binary = cv2.threshold(blurred, 0, 255, cv2.THRESH_BINARY + cv2.THRESH_OTSU)Practical Example: Threshold a Document for OCR
Section titled “Practical Example: Threshold a Document for OCR”-
Load and convert to grayscale:
Python import cv2img = cv2.imread("document_photo.jpg")if img is None:raise FileNotFoundError("Could not load image!")gray = cv2.cvtColor(img, cv2.COLOR_BGR2GRAY) -
Apply Gaussian blur to reduce noise:
Python blurred = cv2.GaussianBlur(gray, (5, 5), 0) -
Try adaptive thresholding (best for documents with uneven lighting):
Python binary = cv2.adaptiveThreshold(blurred, 255,cv2.ADAPTIVE_THRESH_GAUSSIAN_C,cv2.THRESH_BINARY,blockSize=11, C=2) -
Display the result:
Python cv2.imshow("Original", gray)cv2.imshow("Binary (Adaptive)", binary)cv2.waitKey(0)cv2.destroyAllWindows()
Summary Checklist
Section titled “Summary Checklist”- cv2.threshold(): Global threshold. Fast but fails on unevenly lit images. Input must be grayscale.
- THRESH_BINARY: The most common type — above threshold = white, below = black.
- cv2.adaptiveThreshold(): Computes local thresholds. Use
GAUSSIAN_Cfor better results. TuneblockSizeandC. - Otsu’s method: Automatically finds the optimal threshold. Add
cv2.THRESH_OTSUflag and pass 0 as the threshold value. - Blur + Otsu: GaussianBlur before Otsu produces cleaner results — the go-to combo when in doubt.
- Bimodal histograms: Otsu works best when the image has two clear brightness groups. Check with a histogram plot if unsure.