Image Filtering & Smoothing
Smoothing is like squinting at a noisy image — you lose some detail, but the big picture gets clearer. In computer vision, noise is the enemy. Random pixel variations from camera sensors, compression artifacts, or poor lighting can confuse edge detectors, thresholding, and object recognition. Smoothing (blurring) is the antidote.
What is a Kernel?
Section titled “What is a Kernel?”Before diving into OpenCV’s blur functions, you need to understand the kernel — the engine behind all filtering operations.
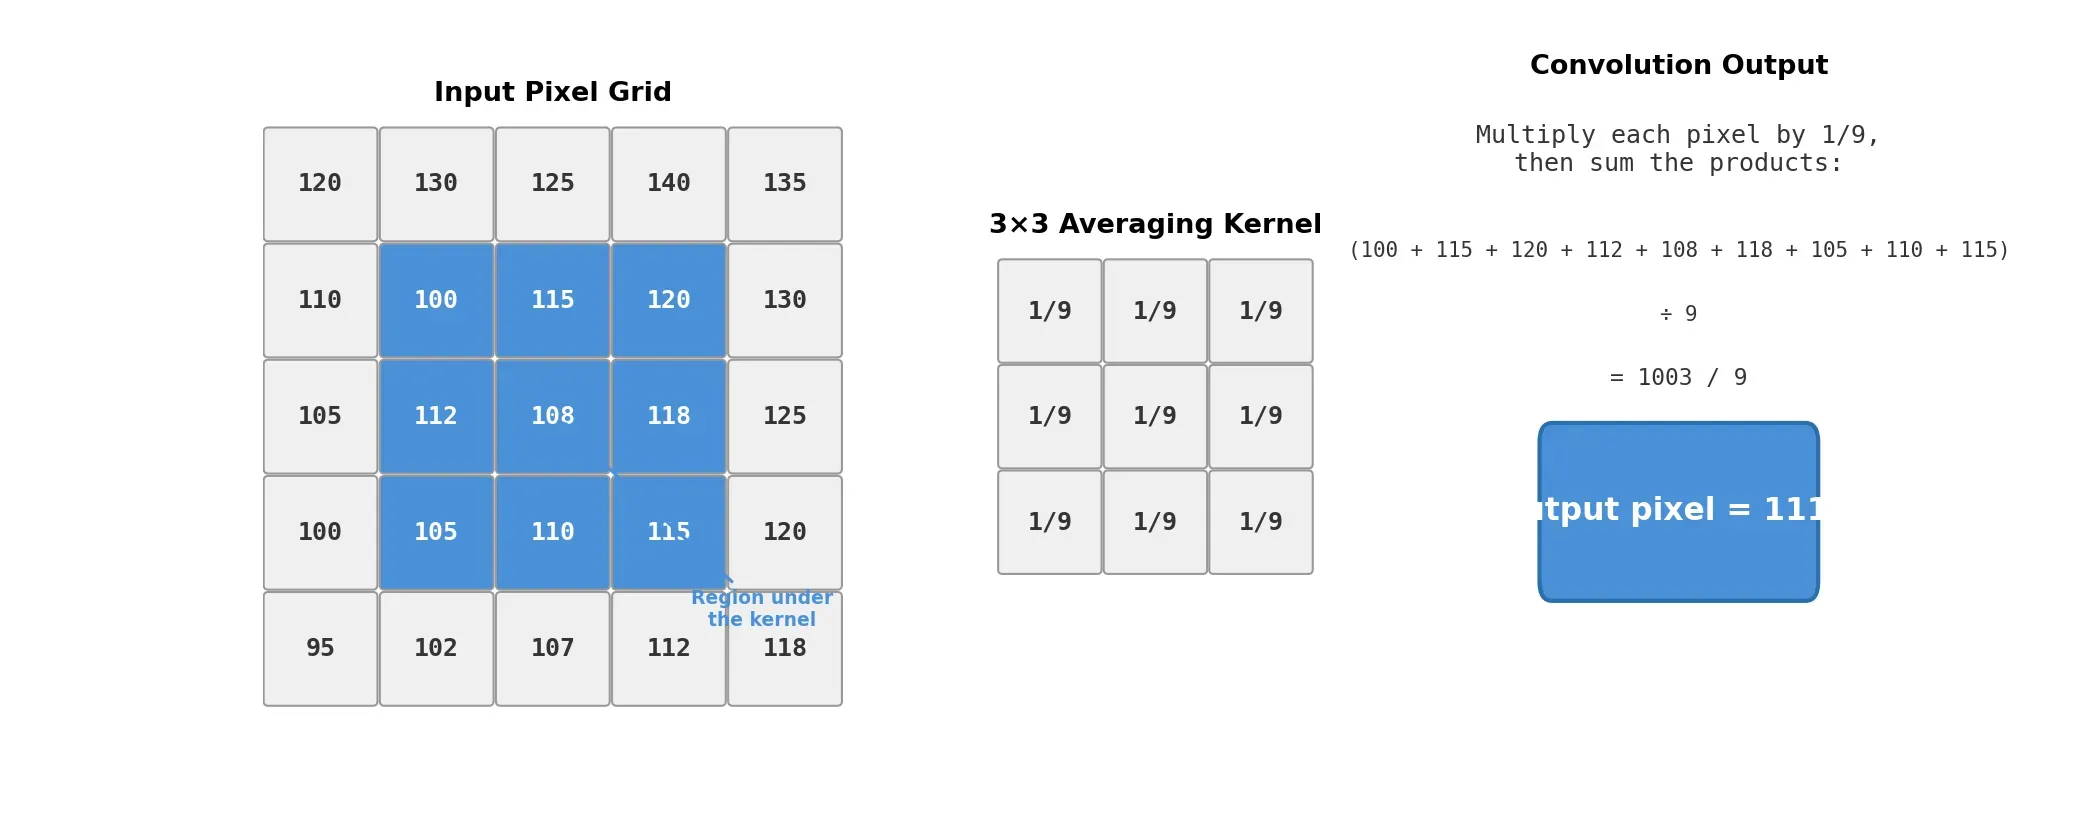
A kernel (also called a “filter” or “mask”) is a small matrix of numbers that slides across the image. At each position, it multiplies its values with the overlapping pixel values, sums them up, and writes the result to the output image. This process is called convolution.
Kernel (3x3 Averaging):           Image Patch:  ┌────────────────┐           ┌────────────────┐  │ 1/9  1/9  1/9  │           │  10   20   30  │  │ 1/9  1/9  1/9  │     ×     │  40   50   60  │  │ 1/9  1/9  1/9  │           │  70   80   90  │  └────────────────┘           └────────────────┘
Output pixel = (10+20+30+40+50+60+70+80+90) / 9 = 50
The kernel slides across every pixel position in the image, computing a new value at each stop. Different kernels produce different effects — averaging kernels blur, derivative kernels detect edges, and sharpening kernels enhance detail.
Mathematically, 2D convolution is:
Where is the kernel and is the image. You don’t need to implement this yourself — OpenCV handles it.
Custom Kernels with cv2.filter2D()
Section titled “Custom Kernels with cv2.filter2D()”Before using the convenience functions, it’s worth knowing you can apply any kernel manually:
import cv2import numpy as np
img = cv2.imread("photo.jpg")
# Create a 5x5 averaging kernelkernel = np.ones((5, 5), np.float32) / 25
# Apply itsmoothed = cv2.filter2D(img, -1, kernel)# -1 means "same depth as the input"
This is the foundation. All the blur functions below are just filter2D with specific kernel designs.
The Four Blurs
Section titled “The Four Blurs”OpenCV provides four blur methods, each optimized for different noise types. Here they are, from simplest to smartest:
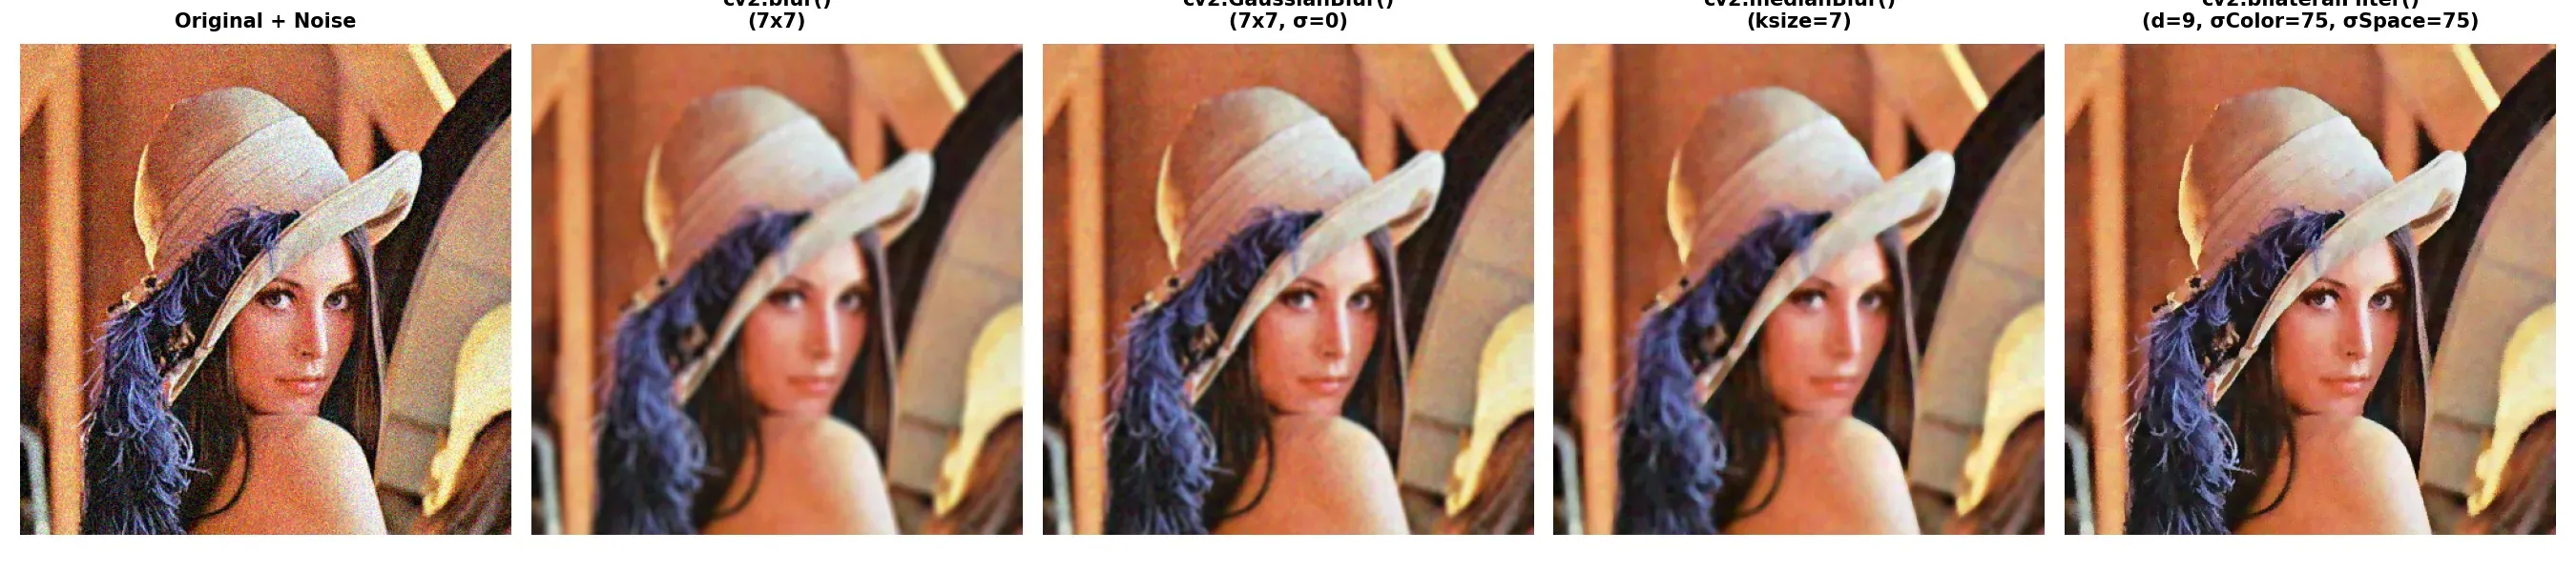
cv2.blur() — Simple Averaging
Section titled “cv2.blur() — Simple Averaging”The most basic filter. It replaces each pixel with the mean of its neighbors. Fast, but it smears everything equally — edges, noise, and details alike.
# Kernel size (7, 7) means a 7x7 neighborhoodblurred = cv2.blur(img, (7, 7))When to use: Quick-and-dirty smoothing when you don’t care about preserving edges. Rarely the best choice, but the fastest.
cv2.GaussianBlur() — Weighted Averaging
Section titled “cv2.GaussianBlur() — Weighted Averaging”Like averaging, but smarter. Pixels closer to the center of the kernel get more weight than those at the edges. This produces a more natural, less “boxy” blur.
# (7, 7) = kernel size, 0 = auto-calculate sigma from kernel sizeblurred = cv2.GaussianBlur(img, (7, 7), 0)
# Or specify sigma manually for more controlblurred = cv2.GaussianBlur(img, (7, 7), sigmaX=1.5)
The Gaussian function that defines the weights:
When to use: The default choice for most preprocessing. Use before edge detection (Canny), thresholding, or any task where you want smooth noise reduction.
cv2.medianBlur() — The Noise Killer
Section titled “cv2.medianBlur() — The Noise Killer”Instead of averaging, this filter replaces each pixel with the median of its neighborhood. This seemingly small change makes it the king of removing salt-and-pepper noise (random black and white dots).
Why? Because a few extreme outlier pixels (the “salt” and “pepper”) can shift an average dramatically, but they can’t shift the median.
# ksize must be an odd integer (not a tuple!)blurred = cv2.medianBlur(img, 7)When to use: When your image has salt-and-pepper noise (common with old cameras, sensor defects, or transmission errors). Also good for reducing fine texture while keeping edges sharper than averaging.
cv2.bilateralFilter() — The Smart Blur
Section titled “cv2.bilateralFilter() — The Smart Blur”The premium option. Bilateral filtering smooths flat areas while preserving edges. It does this by considering not just the distance between pixels (like Gaussian) but also the difference in intensity. Pixels with similar values get blurred together; pixels across an edge boundary don’t.
# d=9: neighborhood diameter# sigmaColor=75: how different colors can be and still blend# sigmaSpace=75: spatial reach (like Gaussian sigma)blurred = cv2.bilateralFilter(img, d=9, sigmaColor=75, sigmaSpace=75)When to use: When edges matter — before edge detection, face processing, or artistic effects. The trade-off is speed: bilateral is significantly slower than the other three.
How to Choose?
Section titled “How to Choose?”| Noise Type | Recommended Filter | Why |
|---|---|---|
| General noise (sensor, compression) | Gaussian | Good all-around performance, natural-looking result |
| Salt-and-pepper (random black/white dots) | Median | Ignores outliers, preserves edges better than averaging |
| Noise but edges must be preserved | Bilateral | Smart blending that respects edge boundaries |
| Speed is all that matters | Averaging | Fastest, but lowest quality |
Practical Example: Denoising a Photo
Section titled “Practical Example: Denoising a Photo”import cv2import numpy as np
# 1. Load the imageimg = cv2.imread("noisy_photo.jpg")if img is None: raise FileNotFoundError("Could not load image!")
# 2. Try different blurs and compareavg_blur = cv2.blur(img, (5, 5))gauss_blur = cv2.GaussianBlur(img, (5, 5), 0)median_blur = cv2.medianBlur(img, 5)bilateral_blur = cv2.bilateralFilter(img, 9, 75, 75)
# 3. Display all resultscv2.imshow("Original", img)cv2.imshow("Averaging", avg_blur)cv2.imshow("Gaussian", gauss_blur)cv2.imshow("Median", median_blur)cv2.imshow("Bilateral", bilateral_blur)cv2.waitKey(0)cv2.destroyAllWindows()Summary Checklist
Section titled “Summary Checklist”- Kernels: Small matrices that slide over the image and compute new pixel values via convolution.
- cv2.filter2D(): Apply any custom kernel to an image.
- cv2.blur(): Simple averaging. Fast but smears everything.
- cv2.GaussianBlur(): Weighted average — the default choice for most tasks. Kernel size must be odd.
- cv2.medianBlur(): Best for salt-and-pepper noise. Takes a single integer, not a tuple.
- cv2.bilateralFilter(): Smooths flat areas while preserving edges. Slower but smarter.
- Kernel size matters: Bigger kernel = more blur. Always use the smallest that gets the job done.