Interactive Drawing with Mouse
OpenCV’s highgui module can capture mouse events on any named window, enabling you to build interactive applications — freehand drawing tools, region-of-interest selectors, point annotators, and visual debug overlays. The mechanism is straightforward: you register a callback function that OpenCV calls every time the mouse does something inside the window.
Setting Up a Mouse Callback
Section titled “Setting Up a Mouse Callback”The core function is:
cv2.setMouseCallback(windowName, onMouse, param=None)- windowName — the exact string you passed to
cv2.namedWindow()(or the window created implicitly bycv2.imshow()). It must match exactly. - onMouse — your callback function.
- param — an optional object forwarded to the callback on every invocation (useful for passing state without globals).
The callback signature is:
def onMouse(event, x, y, flags, param): ...| Argument | Meaning |
|---|---|
event | Integer constant identifying what happened (click, release, move, etc.) |
x, y | Pixel coordinates of the mouse cursor when the event fired |
flags | Bitfield of modifier keys and button states held during the event |
param | Whatever you passed as the third argument to setMouseCallback |
Here is a minimal example that prints coordinates every time you click:
import cv2import numpy as np
def on_click(event, x, y, flags, param):    if event == cv2.EVENT_LBUTTONDOWN:        print(f"Left click at ({x}, {y})")    elif event == cv2.EVENT_RBUTTONDOWN:        print(f"Right click at ({x}, {y})")
canvas = np.zeros((480, 640, 3), dtype=np.uint8)
cv2.namedWindow("Click Demo")cv2.setMouseCallback("Click Demo", on_click)
while True:    cv2.imshow("Click Demo", canvas)    if cv2.waitKey(1) & 0xFF == ord("q"):        break
cv2.destroyAllWindows()
Mouse Events
Section titled “Mouse Events”OpenCV defines a full set of mouse event constants. Every time the mouse does anything inside the window, your callback receives one of these as the event argument.
Event Types
Section titled “Event Types”| Constant | Trigger |
|---|---|
cv2.EVENT_MOUSEMOVE | Mouse pointer moved |
cv2.EVENT_LBUTTONDOWN | Left button pressed |
cv2.EVENT_LBUTTONUP | Left button released |
cv2.EVENT_RBUTTONDOWN | Right button pressed |
cv2.EVENT_RBUTTONUP | Right button released |
cv2.EVENT_MBUTTONDOWN | Middle button pressed |
cv2.EVENT_MBUTTONUP | Middle button released |
cv2.EVENT_LBUTTONDBLCLK | Left button double-click |
cv2.EVENT_RBUTTONDBLCLK | Right button double-click |
cv2.EVENT_MBUTTONDBLCLK | Middle button double-click |
cv2.EVENT_MOUSEWHEEL | Vertical scroll |
cv2.EVENT_MOUSEHWHEEL | Horizontal scroll |
Event Flags
Section titled “Event Flags”The flags argument is a bitfield combining the current state of buttons and modifier keys. Multiple flags can be active at once.
| Constant | Meaning |
|---|---|
cv2.EVENT_FLAG_LBUTTON | Left button is held down |
cv2.EVENT_FLAG_RBUTTON | Right button is held down |
cv2.EVENT_FLAG_MBUTTON | Middle button is held down |
cv2.EVENT_FLAG_CTRLKEY | Ctrl key is held |
cv2.EVENT_FLAG_SHIFTKEY | Shift key is held |
cv2.EVENT_FLAG_ALTKEY | Alt key is held |
The following example displays the event name and cursor position in real-time on the canvas:
import cv2import numpy as np
EVENT_NAMES = {    cv2.EVENT_MOUSEMOVE: "MOUSEMOVE",    cv2.EVENT_LBUTTONDOWN: "LBUTTONDOWN",    cv2.EVENT_LBUTTONUP: "LBUTTONUP",    cv2.EVENT_RBUTTONDOWN: "RBUTTONDOWN",    cv2.EVENT_RBUTTONUP: "RBUTTONUP",    cv2.EVENT_MBUTTONDOWN: "MBUTTONDOWN",    cv2.EVENT_MBUTTONUP: "MBUTTONUP",    cv2.EVENT_LBUTTONDBLCLK: "LBUTTONDBLCLK",    cv2.EVENT_RBUTTONDBLCLK: "RBUTTONDBLCLK",    cv2.EVENT_MBUTTONDBLCLK: "MBUTTONDBLCLK",}
info = {"text": "Move the mouse..."}
def on_mouse(event, x, y, flags, param):    name = EVENT_NAMES.get(event, f"EVENT_{event}")    modifier_parts = []    if flags & cv2.EVENT_FLAG_CTRLKEY:        modifier_parts.append("CTRL")    if flags & cv2.EVENT_FLAG_SHIFTKEY:        modifier_parts.append("SHIFT")    if flags & cv2.EVENT_FLAG_ALTKEY:        modifier_parts.append("ALT")    mods = " + ".join(modifier_parts) if modifier_parts else "none"    info["text"] = f"{name} at ({x}, {y})  modifiers: {mods}"
canvas = np.zeros((480, 640, 3), dtype=np.uint8)
cv2.namedWindow("Event Inspector")cv2.setMouseCallback("Event Inspector", on_mouse)
while True:    display = canvas.copy()    cv2.putText(display, info["text"], (10, 30),                cv2.FONT_HERSHEY_SIMPLEX, 0.6, (0, 255, 0), 1)    cv2.imshow("Event Inspector", display)    if cv2.waitKey(1) & 0xFF == ord("q"):        break
cv2.destroyAllWindows()
Managing State in Callbacks
Section titled “Managing State in Callbacks”Because the callback is invoked by OpenCV’s event loop, you need a strategy for sharing state between the callback and your main loop. There are three common patterns.
Global Variables
Section titled “Global Variables”The simplest approach — just use module-level variables:
drawing = Falselast_point = (-1, -1)
def on_mouse(event, x, y, flags, param):    global drawing, last_point    if event == cv2.EVENT_LBUTTONDOWN:        drawing = True        last_point = (x, y)
This works for quick scripts but becomes difficult to manage as complexity grows.
Mutable Container via param
Section titled “Mutable Container via param”Pass a dictionary as the param argument. Since it is mutable, the callback can update it in place and the main loop can read the changes:
state = {"drawing": False, "points": []}
def on_mouse(event, x, y, flags, param):    if event == cv2.EVENT_LBUTTONDOWN:        param["drawing"] = True        param["points"].append((x, y))
cv2.setMouseCallback("Window", on_mouse, state)
Class-Based (Recommended)
Section titled “Class-Based (Recommended)”Encapsulate all state and drawing logic inside a class. The bound method serves as the callback:
import cv2import numpy as np
class DrawingApp:    def __init__(self, width=640, height=480):        self.canvas = np.zeros((height, width, 3), dtype=np.uint8)        self.drawing = False        self.last_point = (-1, -1)        self.color = (0, 255, 0)
    def on_mouse(self, event, x, y, flags, param):        if event == cv2.EVENT_LBUTTONDOWN:            self.drawing = True            self.last_point = (x, y)        elif event == cv2.EVENT_MOUSEMOVE and self.drawing:            cv2.line(self.canvas, self.last_point, (x, y), self.color, 2)            self.last_point = (x, y)        elif event == cv2.EVENT_LBUTTONUP:            self.drawing = False
    def run(self):        cv2.namedWindow("App")        cv2.setMouseCallback("App", self.on_mouse)        while True:            cv2.imshow("App", self.canvas)            if cv2.waitKey(1) & 0xFF == ord("q"):                break        cv2.destroyAllWindows()
app = DrawingApp()app.run()Practical Example — Freehand Drawing Tool
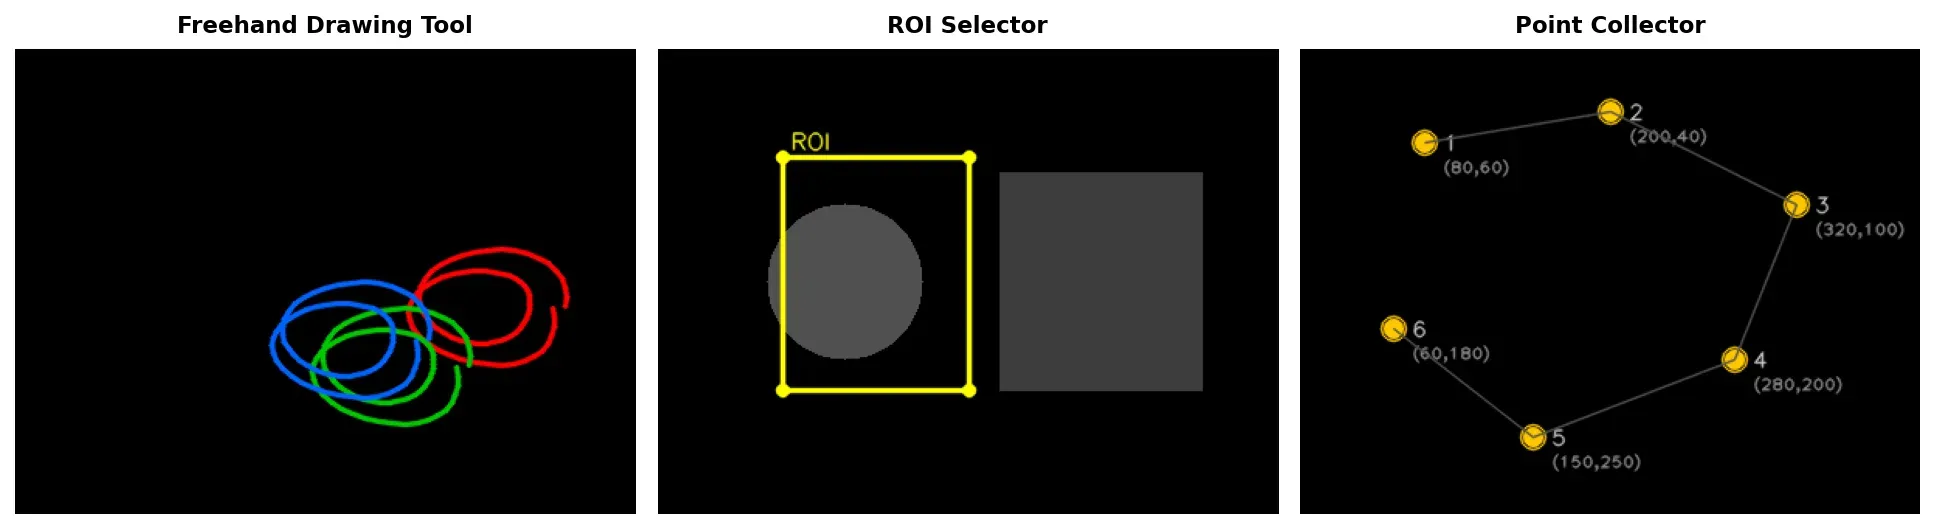
Section titled “Practical Example — Freehand Drawing Tool”Click and drag to draw freehand strokes. Switch colors with the keyboard (r red, g green, b blue), press c to clear the canvas, and q to quit.
import cv2import numpy as np
class FreehandTool:    COLORS = {        ord("r"): (0, 0, 255),        ord("g"): (0, 255, 0),        ord("b"): (255, 0, 0),    }
    def __init__(self, width=640, height=480):        self.width = width        self.height = height        self.canvas = np.zeros((height, width, 3), dtype=np.uint8)        self.drawing = False        self.last_point = (-1, -1)        self.color = (0, 255, 0)        self.thickness = 2
    def on_mouse(self, event, x, y, flags, param):        if event == cv2.EVENT_LBUTTONDOWN:            self.drawing = True            self.last_point = (x, y)
        elif event == cv2.EVENT_MOUSEMOVE:            if self.drawing:                cv2.line(self.canvas, self.last_point, (x, y),                         self.color, self.thickness)                self.last_point = (x, y)
        elif event == cv2.EVENT_LBUTTONUP:            self.drawing = False
    def run(self):        window = "Freehand Drawing"        cv2.namedWindow(window)        cv2.setMouseCallback(window, self.on_mouse)
        while True:            # Show color indicator in top-left corner            display = self.canvas.copy()            cv2.circle(display, (20, 20), 10, self.color, -1)            cv2.putText(display, "r/g/b: color | c: clear | q: quit",                        (40, 25), cv2.FONT_HERSHEY_SIMPLEX,                        0.5, (200, 200, 200), 1)
            cv2.imshow(window, display)            key = cv2.waitKey(1) & 0xFF
            if key == ord("q"):                break            elif key == ord("c"):                self.canvas = np.zeros((self.height, self.width, 3),                                       dtype=np.uint8)            elif key in self.COLORS:                self.color = self.COLORS[key]
        cv2.destroyAllWindows()
tool = FreehandTool()tool.run()
The key idea is tracking three events: LBUTTONDOWN starts a stroke and records the first point, MOUSEMOVE while the left button flag is active draws segments between consecutive points, and LBUTTONUP ends the stroke.
Practical Example — ROI Selector
Section titled “Practical Example — ROI Selector”Click and drag to select a rectangular region. The rectangle is drawn in real-time while dragging. On release, the selected region is cropped and displayed in a separate window.
import cv2import numpy as np
class ROISelector:    def __init__(self, width=640, height=480):        self.canvas = np.zeros((height, width, 3), dtype=np.uint8)        # Draw some content so we have something to crop        for i in range(0, height, 40):            cv2.line(self.canvas, (0, i), (width, i), (50, 50, 50), 1)        for j in range(0, width, 40):            cv2.line(self.canvas, (j, 0), (j, height), (50, 50, 50), 1)        cv2.putText(self.canvas, "Drag to select a region",                    (150, 240), cv2.FONT_HERSHEY_SIMPLEX,                    0.8, (0, 200, 200), 2)
        self.dragging = False        self.start = (-1, -1)        self.end = (-1, -1)        self.selection_made = False
    def on_mouse(self, event, x, y, flags, param):        if event == cv2.EVENT_LBUTTONDOWN:            self.dragging = True            self.start = (x, y)            self.end = (x, y)            self.selection_made = False
        elif event == cv2.EVENT_MOUSEMOVE and self.dragging:            self.end = (x, y)
        elif event == cv2.EVENT_LBUTTONUP:            self.dragging = False            self.end = (x, y)            self.selection_made = True
    def run(self):        window = "ROI Selector"        cv2.namedWindow(window)        cv2.setMouseCallback(window, self.on_mouse)
        while True:            display = self.canvas.copy()
            # Draw the selection rectangle while dragging            if self.dragging:                cv2.rectangle(display, self.start, self.end,                              (0, 255, 255), 2)
            # Crop and show the selected region            if self.selection_made:                x1 = min(self.start[0], self.end[0])                y1 = min(self.start[1], self.end[1])                x2 = max(self.start[0], self.end[0])                y2 = max(self.start[1], self.end[1])
                # Guard against zero-size selections                if x2 - x1 > 1 and y2 - y1 > 1:                    roi = self.canvas[y1:y2, x1:x2]                    cv2.imshow("Cropped ROI", roi)                    cv2.rectangle(display, (x1, y1), (x2, y2),                                  (0, 255, 0), 2)
                self.selection_made = False
            cv2.imshow(window, display)            if cv2.waitKey(1) & 0xFF == ord("q"):                break
        cv2.destroyAllWindows()
selector = ROISelector()selector.run()Practical Example — Point Collector
Section titled “Practical Example — Point Collector”Left-click to place numbered points on the canvas. Right-click to remove the last point. Press Enter to finalize and print all collected coordinates to the terminal.
import cv2import numpy as np
class PointCollector:    def __init__(self, width=640, height=480):        self.width = width        self.height = height        self.canvas = np.zeros((height, width, 3), dtype=np.uint8)        self.points = []
    def on_mouse(self, event, x, y, flags, param):        if event == cv2.EVENT_LBUTTONDOWN:            self.points.append((x, y))
        elif event == cv2.EVENT_RBUTTONDOWN:            if self.points:                self.points.pop()
    def draw_points(self, image):        for i, (px, py) in enumerate(self.points):            cv2.circle(image, (px, py), 5, (0, 255, 0), -1)            label = f"{i + 1} ({px},{py})"            cv2.putText(image, label, (px + 10, py - 5),                        cv2.FONT_HERSHEY_SIMPLEX, 0.4,                        (255, 255, 255), 1)
            # Draw line connecting consecutive points            if i > 0:                cv2.line(image, self.points[i - 1], (px, py),                         (100, 100, 255), 1)
    def run(self):        window = "Point Collector"        cv2.namedWindow(window)        cv2.setMouseCallback(window, self.on_mouse)
        while True:            display = self.canvas.copy()            self.draw_points(display)
            status = f"Points: {len(self.points)} | " \                     "Left: add | Right: undo | Enter: done | q: quit"            cv2.putText(display, status, (10, self.height - 15),                        cv2.FONT_HERSHEY_SIMPLEX, 0.45,                        (180, 180, 180), 1)
            cv2.imshow(window, display)            key = cv2.waitKey(1) & 0xFF
            if key == ord("q"):                break            elif key == 13:  # Enter key                print(f"\nCollected {len(self.points)} points:")                for i, (px, py) in enumerate(self.points):                    print(f"  Point {i + 1}: ({px}, {py})")                break
        cv2.destroyAllWindows()        return self.points
collector = PointCollector()points = collector.run()
All three examples follow the same architecture: a class holds mutable state, a bound method serves as the mouse callback, and the main loop reads that state to produce the display. Once you internalize this pattern, you can build any interactive tool — polygon annotators, color pickers, measurement rulers — by swapping out the event-handling logic.