Adding Text to Images
Adding text to images is one of the most common tasks in computer vision: labeling detected objects, displaying FPS counters, stamping timestamps, or showing classification results. OpenCV provides cv2.putText() for rendering and cv2.getTextSize() for measuring text dimensions before drawing.
cv2.putText() — Rendering Text
Section titled “cv2.putText() — Rendering Text”The full signature for rendering text onto an image is:
cv2.putText(img, text, org, fontFace, fontScale, color, thickness=1, lineType=cv2.LINE_8, bottomLeftOrigin=False)img— Image to draw on (modified in place)text— The string to renderorg— Bottom-left corner of the text string(x, y)fontFace— Font type constant (e.g.cv2.FONT_HERSHEY_SIMPLEX)fontScale— Font size multiplier relative to the base sizecolor— Text color as(B, G, R)thickness— Stroke thickness in pixels (default 1)lineType— Usecv2.LINE_AAfor anti-aliased (smooth) textbottomLeftOrigin— IfTrue, origin is at image bottom-left (rarely used)
import cv2import numpy as np
canvas = np.zeros((300, 600, 3), dtype=np.uint8)
cv2.putText(canvas, "Hello OpenCV", (50, 150),            cv2.FONT_HERSHEY_SIMPLEX, 1.5, (255, 255, 255), 2, cv2.LINE_AA)
cv2.imshow("Text", canvas)cv2.waitKey(0)cv2.destroyAllWindows()Font Faces
Section titled “Font Faces”OpenCV ships with Hershey fonts. Each has a distinct style and weight:
FONT_HERSHEY_SIMPLEX— Normal size sans-serifFONT_HERSHEY_PLAIN— Small size sans-serifFONT_HERSHEY_DUPLEX— Sans-serif, thicker than SIMPLEXFONT_HERSHEY_COMPLEX— Normal size serifFONT_HERSHEY_TRIPLEX— Serif, thicker than COMPLEXFONT_HERSHEY_COMPLEX_SMALL— Smaller version of COMPLEXFONT_HERSHEY_SCRIPT_SIMPLEX— Handwriting styleFONT_HERSHEY_SCRIPT_COMPLEX— Handwriting, thicker strokesFONT_ITALIC— Flag combined with any font via bitwise OR
The following code renders every font face on a single canvas:
import cv2import numpy as np
fonts = [    (cv2.FONT_HERSHEY_SIMPLEX, "SIMPLEX"),    (cv2.FONT_HERSHEY_PLAIN, "PLAIN"),    (cv2.FONT_HERSHEY_DUPLEX, "DUPLEX"),    (cv2.FONT_HERSHEY_COMPLEX, "COMPLEX"),    (cv2.FONT_HERSHEY_TRIPLEX, "TRIPLEX"),    (cv2.FONT_HERSHEY_COMPLEX_SMALL, "COMPLEX_SMALL"),    (cv2.FONT_HERSHEY_SCRIPT_SIMPLEX, "SCRIPT_SIMPLEX"),    (cv2.FONT_HERSHEY_SCRIPT_COMPLEX, "SCRIPT_COMPLEX"),    (cv2.FONT_HERSHEY_SIMPLEX | cv2.FONT_ITALIC, "SIMPLEX + ITALIC"),]
canvas = np.zeros((450, 700, 3), dtype=np.uint8)
for i, (font, name) in enumerate(fonts):    y = 40 + i * 45    cv2.putText(canvas, name, (20, y), font, 1.0, (0, 255, 200), 1, cv2.LINE_AA)
cv2.imshow("Font Faces", canvas)cv2.waitKey(0)cv2.destroyAllWindows()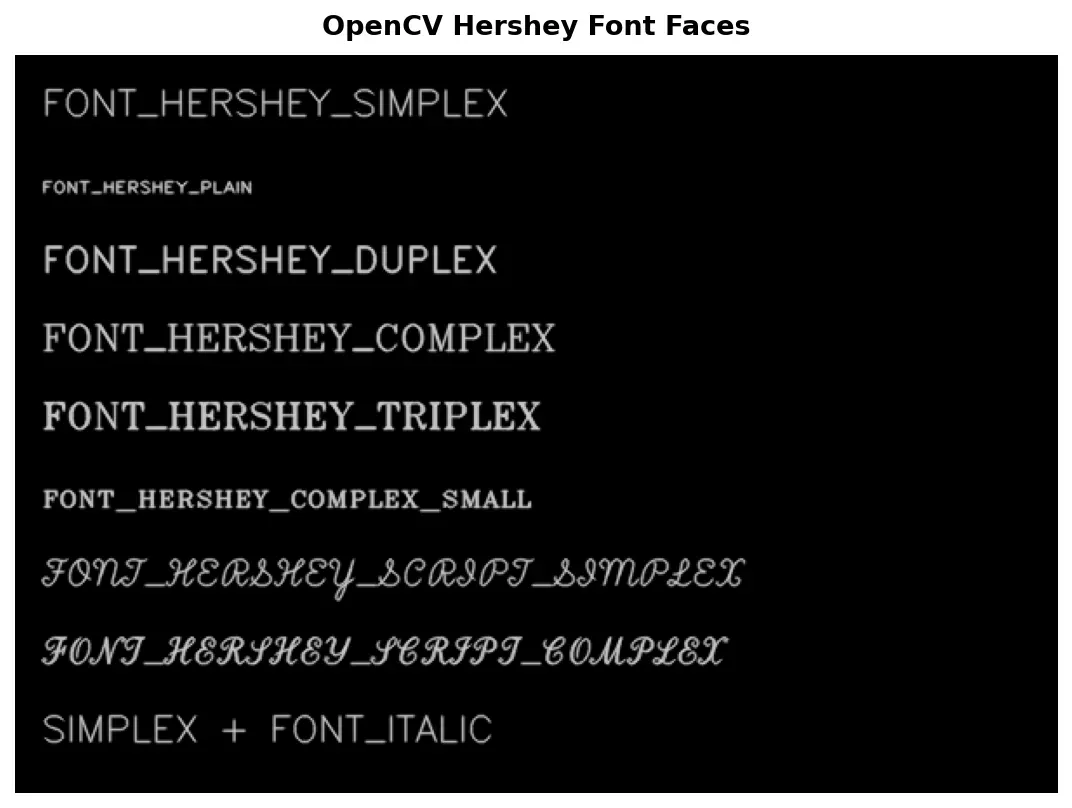
Font Scale and Thickness
Section titled “Font Scale and Thickness”fontScale is a multiplier on the base font size: 0.5 for half, 1.0 for default, 2.0 for double. thickness controls stroke boldness. Always use cv2.LINE_AA for smooth anti-aliased edges.
import cv2import numpy as np
canvas = np.zeros((350, 800, 3), dtype=np.uint8)
# Different font scalescv2.putText(canvas, "Scale 0.5", (30, 40), cv2.FONT_HERSHEY_SIMPLEX, 0.5, (200, 200, 200), 1, cv2.LINE_AA)cv2.putText(canvas, "Scale 1.0", (30, 100), cv2.FONT_HERSHEY_SIMPLEX, 1.0, (200, 200, 200), 1, cv2.LINE_AA)cv2.putText(canvas, "Scale 2.0", (30, 200), cv2.FONT_HERSHEY_SIMPLEX, 2.0, (200, 200, 200), 1, cv2.LINE_AA)
# Different thicknessescv2.putText(canvas, "Thin (1)", (450, 80), cv2.FONT_HERSHEY_SIMPLEX, 1.0, (100, 255, 100), 1, cv2.LINE_AA)cv2.putText(canvas, "Medium (2)", (450, 160), cv2.FONT_HERSHEY_SIMPLEX, 1.0, (100, 255, 100), 2, cv2.LINE_AA)cv2.putText(canvas, "Bold (4)", (450, 240), cv2.FONT_HERSHEY_SIMPLEX, 1.0, (100, 255, 100), 4, cv2.LINE_AA)
cv2.imshow("Scale and Thickness", canvas)cv2.waitKey(0)cv2.destroyAllWindows()
Measuring Text — cv2.getTextSize()
Section titled “Measuring Text — cv2.getTextSize()”Before placing text you often need to know how much space it will occupy. cv2.getTextSize() returns dimensions without drawing:
(width, height), baseline = cv2.getTextSize(text, fontFace, fontScale, thickness)It returns ((width, height), baseline). The baseline is the distance below the text bottom to the lowest point of descenders like “g” and “p”.
Centering Text
Section titled “Centering Text”import cv2import numpy as np
canvas = np.zeros((400, 600, 3), dtype=np.uint8)text = "Centered Text"font = cv2.FONT_HERSHEY_SIMPLEXscale = 1.5thickness = 2
(text_w, text_h), baseline = cv2.getTextSize(text, font, scale, thickness)
# Calculate position to center the textx = (canvas.shape[1] - text_w) // 2y = (canvas.shape[0] + text_h) // 2
cv2.putText(canvas, text, (x, y), font, scale, (255, 255, 255), thickness, cv2.LINE_AA)
cv2.imshow("Centered", canvas)cv2.waitKey(0)cv2.destroyAllWindows()Drawing a Background Rectangle
Section titled “Drawing a Background Rectangle”Draw a filled rectangle behind text to improve readability — the same pattern used for detection label boxes:
import cv2import numpy as np
canvas = np.zeros((300, 500, 3), dtype=np.uint8)text = "Label Box"font = cv2.FONT_HERSHEY_SIMPLEXscale = 1.0thickness = 2padding = 10
(text_w, text_h), baseline = cv2.getTextSize(text, font, scale, thickness)
# Top-left corner of the labelorg_x, org_y = 50, 100
# Background rectangle: accounts for text height, baseline, and paddingrect_top_left = (org_x - padding, org_y - text_h - padding)rect_bottom_right = (org_x + text_w + padding, org_y + baseline + padding)
cv2.rectangle(canvas, rect_top_left, rect_bottom_right, (0, 120, 255), cv2.FILLED)cv2.putText(canvas, text, (org_x, org_y), font, scale, (255, 255, 255), thickness, cv2.LINE_AA)
cv2.imshow("Label Box", canvas)cv2.waitKey(0)cv2.destroyAllWindows()
Multiline Text
Section titled “Multiline Text”OpenCV does not support \n in cv2.putText() — newlines are ignored or rendered as literal characters. The solution is to split the text into lines, calculate line height with getTextSize(), and render each line at an incremented y position:
import cv2import numpy as np

def put_multiline_text(img, text, org, font, scale, color, thickness, line_spacing=1.5):    """Render multiline text. org is the top-left of the text block."""    x, y = org    lines = text.split("\n")
    for i, line in enumerate(lines):        (_, line_h), _ = cv2.getTextSize(line, font, scale, thickness)        line_y = y + int(i * line_h * line_spacing) + line_h        cv2.putText(img, line, (x, line_y), font, scale, color, thickness, cv2.LINE_AA)

canvas = np.zeros((400, 600, 3), dtype=np.uint8)
message = "Line 1: Hello\nLine 2: OpenCV\nLine 3: Multiline\nLine 4: Text!"put_multiline_text(canvas, message, (30, 30),                   cv2.FONT_HERSHEY_SIMPLEX, 1.0, (255, 255, 255), 2)
cv2.imshow("Multiline", canvas)cv2.waitKey(0)cv2.destroyAllWindows()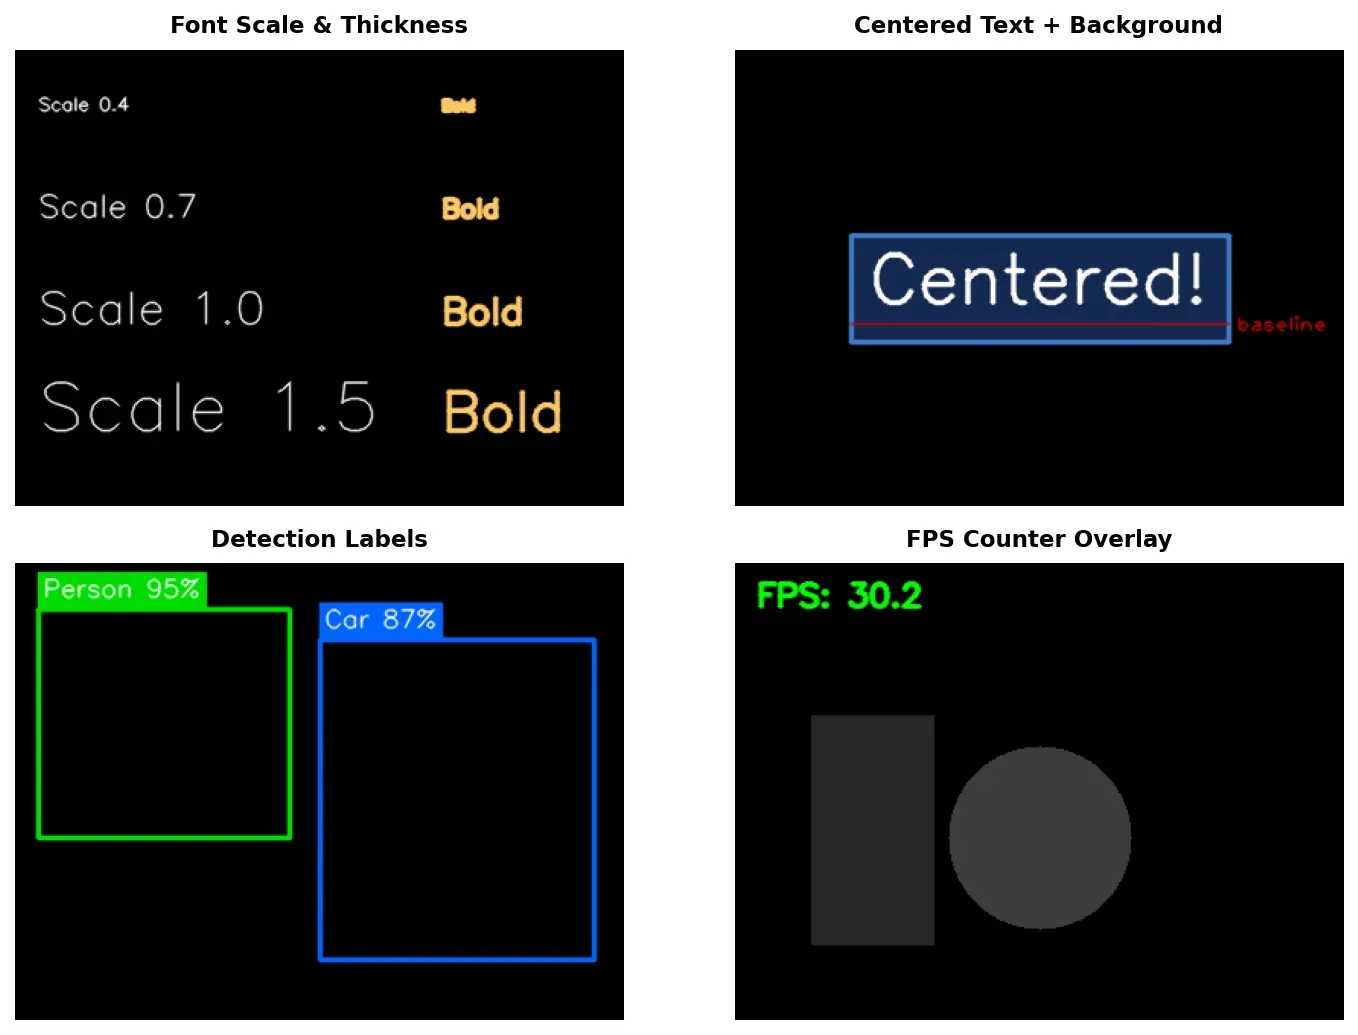
Practical Example — FPS Counter Overlay
Section titled “Practical Example — FPS Counter Overlay”Real-time vision applications typically display an FPS counter in a corner. A semi-transparent background keeps the text readable over any scene:
import cv2import numpy as np
def draw_fps(frame, fps, position="top-left"):    """Draw an FPS counter with semi-transparent background."""    text = f"FPS: {fps:.1f}"    font = cv2.FONT_HERSHEY_SIMPLEX    scale, thickness, padding = 0.7, 2, 8
    (text_w, text_h), baseline = cv2.getTextSize(text, font, scale, thickness)    x = frame.shape[1] - text_w - 2 * padding if position == "top-right" else 0    bg_w, bg_h = text_w + 2 * padding, text_h + baseline + 2 * padding
    # Semi-transparent overlay    overlay = frame.copy()    cv2.rectangle(overlay, (x, 0), (x + bg_w, bg_h), (0, 0, 0), cv2.FILLED)    cv2.addWeighted(overlay, 0.6, frame, 0.4, 0, frame)
    # Draw text on top    cv2.putText(frame, text, (x + padding, padding + text_h),                font, scale, (0, 255, 0), thickness, cv2.LINE_AA)    return frame
# Democanvas = np.zeros((480, 640, 3), dtype=np.uint8)canvas[:] = (60, 60, 60)draw_fps(canvas, 29.97, position="top-left")
cv2.imshow("FPS Overlay", canvas)cv2.waitKey(0)cv2.destroyAllWindows()
Practical Example — Detection Labels
Section titled “Practical Example — Detection Labels”Every object detection visualization follows the same pattern: a bounding box with a filled label bar above it showing the class name and confidence. Here is a reusable function for this:
import cv2import numpy as np

def draw_detection(img, bbox, label, confidence, color=(0, 255, 0)):    """Draw a bounding box with a filled label bar above it."""    x1, y1, x2, y2 = bbox    font = cv2.FONT_HERSHEY_SIMPLEX    scale = 0.6    thickness = 1
    # Draw bounding box    cv2.rectangle(img, (x1, y1), (x2, y2), color, 2)
    # Build label text    text = f"{label} {confidence:.2f}"    (text_w, text_h), baseline = cv2.getTextSize(text, font, scale, thickness)
    # Draw filled rectangle above the bounding box for the label    label_y1 = max(y1 - text_h - baseline - 6, 0)    label_y2 = y1    cv2.rectangle(img, (x1, label_y1), (x1 + text_w + 8, label_y2), color, cv2.FILLED)
    # Draw label text (black on colored background)    cv2.putText(img, text, (x1 + 4, y1 - baseline - 3),                font, scale, (0, 0, 0), thickness, cv2.LINE_AA)

# Demo: simulate detection results on a blank canvascanvas = np.zeros((500, 700, 3), dtype=np.uint8)canvas[:] = (40, 40, 40)
draw_detection(canvas, (50, 80, 250, 350), "person", 0.95, (0, 255, 0))draw_detection(canvas, (300, 120, 480, 400), "dog", 0.87, (255, 150, 0))draw_detection(canvas, (500, 60, 670, 220), "car", 0.72, (0, 100, 255))
cv2.imshow("Detection Labels", canvas)cv2.waitKey(0)cv2.destroyAllWindows()