Geometric Transformations
Sometimes the image content is fine, but its geometry is wrong — it’s too big, rotated sideways, or shot from an angle. Geometric transformations change where pixels are, not what they are. Think of it as physically moving, stretching, or rotating the image canvas.
Resizing
Section titled “Resizing”cv2.resize() is probably the geometric function you’ll use most. You can specify the output size explicitly or use scale factors.
import cv2
img = cv2.imread("photo.jpg")h, w = img.shape[:2]
# Method 1: Explicit dimensions (width, height)resized = cv2.resize(img, (640, 480))
# Method 2: Scale factorshalf = cv2.resize(img, None, fx=0.5, fy=0.5)double = cv2.resize(img, None, fx=2.0, fy=2.0)Interpolation Methods
Section titled “Interpolation Methods”When resizing, OpenCV needs to “invent” pixel values that don’t exist in the original image. The method it uses is called interpolation, and the choice matters:
| Method | Flag | Best For | Quality |
|---|---|---|---|
| Nearest Neighbor | cv2.INTER_NEAREST | Pixel art, masks | Fastest, blocky |
| Bilinear | cv2.INTER_LINEAR | General upscaling (default) | Good |
| Bicubic | cv2.INTER_CUBIC | High-quality upscaling | Better, slower |
| Area-based | cv2.INTER_AREA | Downscaling | Best for shrinking |
# Upscaling: use INTER_CUBIC for qualityupscaled = cv2.resize(img, None, fx=4.0, fy=4.0,                       interpolation=cv2.INTER_CUBIC)
# Downscaling: use INTER_AREA to avoid aliasingthumbnail = cv2.resize(img, (160, 120),                        interpolation=cv2.INTER_AREA)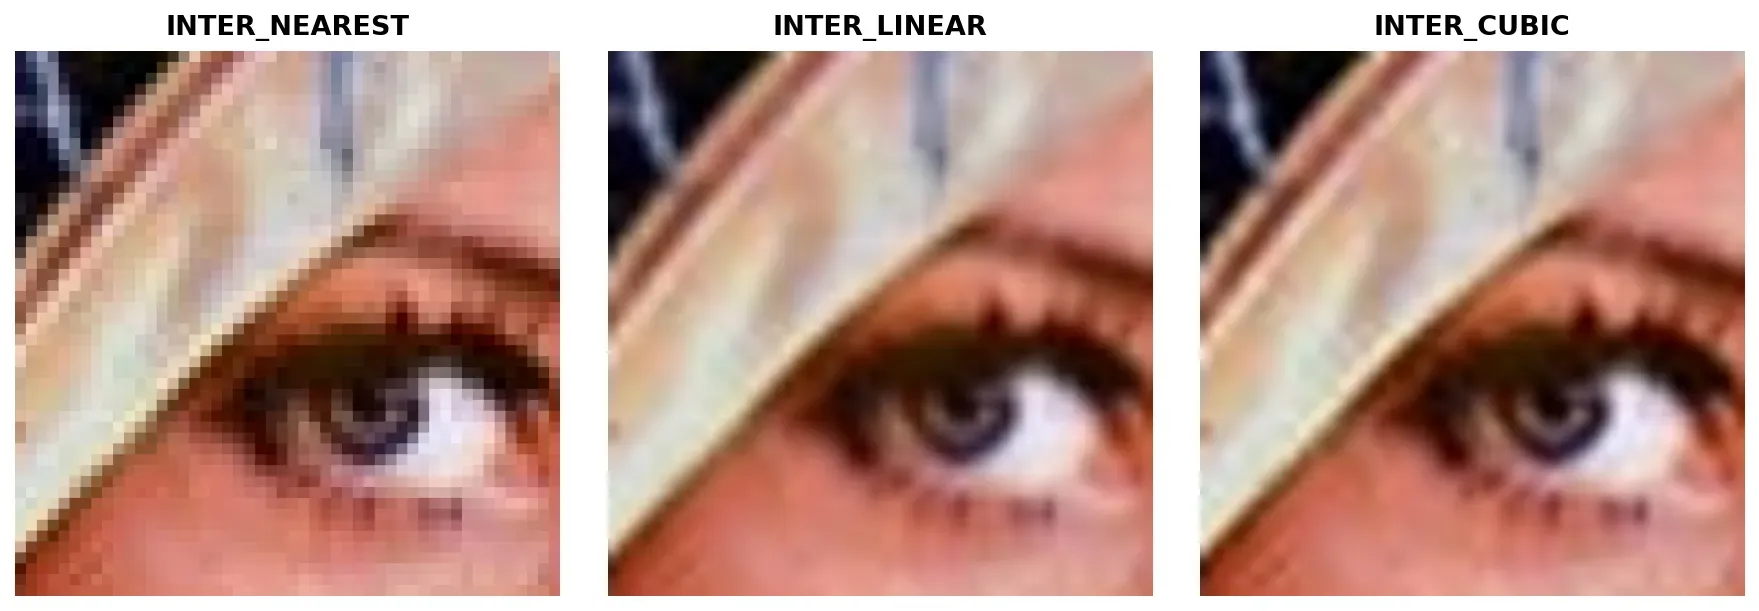
Flipping
Section titled “Flipping”The simplest geometric transform. cv2.flip() mirrors the image along an axis.
# flipCode = 1: Horizontal flip (mirror)flipped_h = cv2.flip(img, 1)
# flipCode = 0: Vertical flip (upside down)flipped_v = cv2.flip(img, 0)
# flipCode = -1: Both axes (180° rotation)flipped_both = cv2.flip(img, -1)
Flipping is commonly used for data augmentation in machine learning — doubling your training dataset by adding mirrored copies.
Rotation
Section titled “Rotation”For 90° increments, use cv2.rotate():
# 90° clockwiserotated = cv2.rotate(img, cv2.ROTATE_90_CLOCKWISE)
# 90° counter-clockwiserotated = cv2.rotate(img, cv2.ROTATE_90_COUNTERCLOCKWISE)
# 180°rotated = cv2.rotate(img, cv2.ROTATE_180)
For arbitrary angles, you need a rotation matrix:
h, w = img.shape[:2]center = (w // 2, h // 2)
# 1. Create the rotation matrix# Parameters: center, angle (degrees, counter-clockwise), scaleM = cv2.getRotationMatrix2D(center, angle=45, scale=1.0)
# 2. Apply the rotationrotated = cv2.warpAffine(img, M, (w, h))Translation (Shifting)
Section titled “Translation (Shifting)”Translation moves the image without rotating or scaling it. You build a 2×3 transformation matrix manually:
Where is the horizontal shift and is the vertical shift (positive = right/down).
import numpy as np
# Shift 100 pixels right, 50 pixels downtx, ty = 100, 50M = np.float32([[1, 0, tx],                [0, 1, ty]])
shifted = cv2.warpAffine(img, M, (w, h))
Affine Transformations
Section titled “Affine Transformations”Translation, rotation, scaling, and shearing are all special cases of affine transformations. An affine transform preserves parallel lines — rectangles become parallelograms, but straight lines stay straight.
To define a general affine transform, you need 3 pairs of corresponding points (source → destination):
import numpy as np
# Define 3 source points and where they should map tosrc_pts = np.float32([[50, 50], [200, 50], [50, 200]])dst_pts = np.float32([[10, 100], [200, 50], [100, 250]])
# Compute the 2x3 affine matrixM = cv2.getAffineTransform(src_pts, dst_pts)
# Apply itwarped = cv2.warpAffine(img, M, (w, h))
Perspective Transform
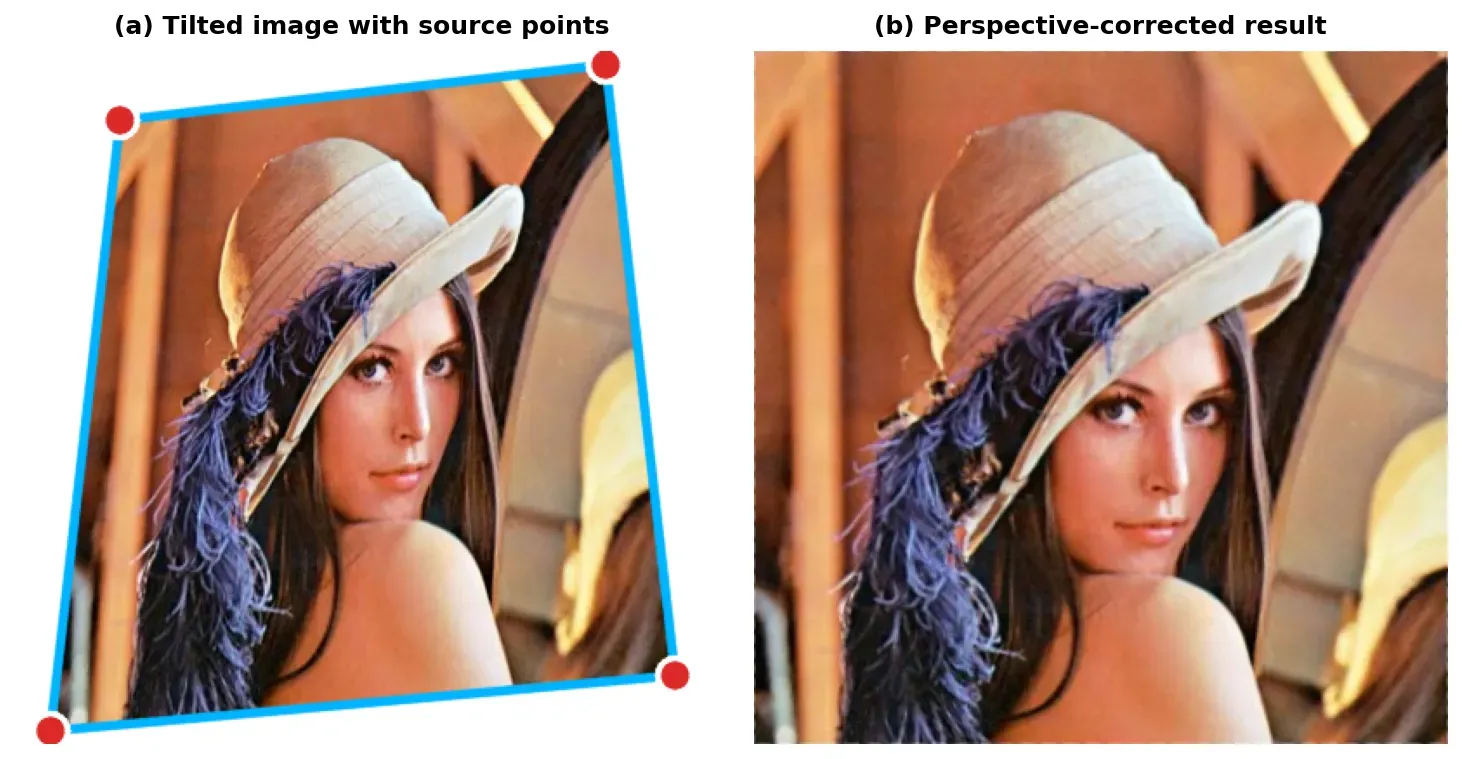
Section titled “Perspective Transform”Perspective (projective) transform is the big brother of affine transform. While affine preserves parallel lines, perspective transform can make parallel lines converge — exactly what happens when you photograph a rectangular document from an angle.
You need 4 pairs of corresponding points to define a perspective transform:
-
Identify 4 source points on the input image (e.g., the corners of a tilted document).
Python import numpy as np# The 4 corners of the document in the photo# (found manually or via contour detection)src_pts = np.float32([[56, 65], # Top-left[368, 52], # Top-right[28, 387], # Bottom-left[389, 390] # Bottom-right]) -
Define 4 destination points — where those corners should end up (usually a clean rectangle).
Python # Map to a clean 400x400 rectangledst_pts = np.float32([[0, 0], # Top-left[400, 0], # Top-right[0, 400], # Bottom-left[400, 400] # Bottom-right]) -
Compute the 3×3 perspective matrix and warp.
Python M = cv2.getPerspectiveTransform(src_pts, dst_pts)result = cv2.warpPerspective(img, M, (400, 400))
Practical Example: Simple Document Scanner
Section titled “Practical Example: Simple Document Scanner”import cv2import numpy as np
# 1. Load the photo of a document taken at an angleimg = cv2.imread("document_photo.jpg")if img is None: raise FileNotFoundError("Could not load image!")
# 2. Define source points (the document corners in the photo)# In practice, you'd detect these with contour detectionsrc = np.float32([[100, 50], [450, 30], [80, 520], [470, 500]])
# 3. Define destination: a clean A4-ratio rectangledst = np.float32([[0, 0], [400, 0], [0, 560], [400, 560]])
# 4. Compute the perspective transform matrixM = cv2.getPerspectiveTransform(src, dst)
# 5. Warp the imagescanned = cv2.warpPerspective(img, M, (400, 560))
# 6. Optional: Convert to grayscale and threshold for a "scanned" lookgray = cv2.cvtColor(scanned, cv2.COLOR_BGR2GRAY)_, binary = cv2.threshold(gray, 0, 255, cv2.THRESH_BINARY + cv2.THRESH_OTSU)
cv2.imshow("Original", img)cv2.imshow("Scanned", binary)cv2.waitKey(0)cv2.destroyAllWindows()Summary Checklist
Section titled “Summary Checklist”- cv2.resize(): Takes
(width, height), NOT(height, width). UseINTER_AREAfor shrinking,INTER_CUBICfor upscaling. - cv2.flip(): flipCode 1 = horizontal, 0 = vertical, -1 = both.
- Rotation: Use
cv2.rotate()for 90° steps. For arbitrary angles, usecv2.getRotationMatrix2D()+cv2.warpAffine(). - Translation: Build a 2×3 matrix with
[1, 0, tx]and[0, 1, ty]. - Affine transform: 3 point pairs →
cv2.getAffineTransform()→cv2.warpAffine(). Preserves parallel lines. - Perspective transform: 4 point pairs →
cv2.getPerspectiveTransform()→cv2.warpPerspective(). Can “unflatten” tilted documents.